Design System
v1.5.0
NDS on GitHub
Static Site Builder
With the NIAID Design System Static Site Builder, creating a responsive and compliant website is quick and easy. The Static Site Builder leverages a technology called Pattern Lab to manage web components and the content.
Use the Static Site Builder if:
- Your website needs to be built quickly.
- Your website is small with relatively static content.
- Your team lacks signficant development resources.
- Your team has basic knowledge of HTML, CSS, JS.
Prerequisites
In addition to a basic understanding of HTML, CSS, and JS, you’ll need several application packages to work with the Static Site Builder. You can download and install the necessary packages below:
Pattern Lab
The NDS Static Site Builder is built with Pattern Lab, a development framework architected on the principle of Atomic Design. While this technology was originally built to showcase web components, Pattern Lab can also be leveraged to intuitively manage and generate complete static websites. The Static Site Builder consists of an instance of Pattern Lab coupled with NDS components and assets to allow you to quickly build your website. While we have written this guide to be effective even if you do not have Pattern Lab experience, we encourage you to familiarize yourself with the documentation on the Pattern Lab website. Additionally, we have provided more information about the organization of the Pattern Lab directory on the Development page.
Download & Initialization
1. Download the Static Website Package:
2. Unzip and Open the Directory in Your Preferred Code Editor.
Editors like Visual Studio Code are free to download and provide many features that make development easier.
3. Install Node Dependencies
Open a new terminal and change into your project directory. If using Visual Studio Code, you may select Terminal -> New Terminal from the application bar. Run the following command in order to install the needed dependencies:
npm ci4. Open the Project on Your Localhost
In your terminal, run:
gulpThis will compile your project and create a localhost with your patterns and pages. Use the navigation bar at the top of the page to navigate to your components.
Working with NDS
Whether you are building a static site or a Drupal site, once your project is setup you can begin to add pages, make new components, and make customizations. All NDS out-of-the-box components live in the 00-nds directory inside of the _patterns/ folder. If custom components, style rules, or functionality are needed, do not make changes inside the 00-nds directory as this folder may get updated and overwritten. If you need to make your own custom components, place them in the appropriate Atomic folders outside of the 00-nds directory.
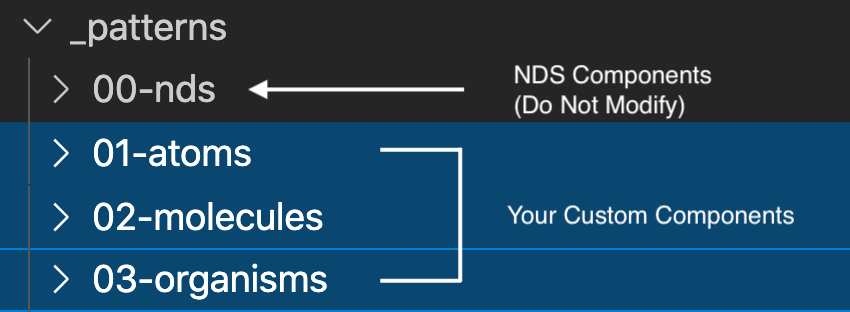
Custom components should be placed in the Atomic folders outside of the 00-nds/ directory.
Credit:
NIAID
The global project CSS rules can be found in the css/ directory in src/. The css/global/ folder is similar to the 00-nds/ folder in that custom changes should not occur within the directory. Instead make edits in the css/overrides/ directory. Here you can create new files and write custom style rules. If new files are created, be sure they are imported in the style.scss file.
For both static and Drupal-based websites, the CSS and JS will need to be compiled before it is reflected on the site. Run the following commands depending on your project type:
Static Websites:
gulpDrupal Websites:
cd patternlabgulpRunning the Gulp command will compile the project assets and produce a localhost with your Pattern Lab style guide. Note that the Gulp script is configured to watch files and listen for changes. When changes are detected, Gulp will automatically recompile your assets and refresh the localhost so you can verify your changes.
For Drupal-based projects, you may need to clear the Drupal cache to see your changes.
Working with JavaScript in NDS
NDS provides global and component functionality through JS files located in the 00-nds/ folder. NDS component JS is modular and is initialized in the js/global/init.js file.
There may be instances where you would like to exclude certain pieces of this functionality from nds-min.js, or would like to replace out of the box functionality with your own. In either case, create a file with the same name and path outside of the 00-nds/ folder and, optionally, write your own JavaScript to replace it (leaving the file blank will simply exclude the functionality). For example, to exclude or replace the 00-nds/02-molecules/analytics/analytics-google/analytics-google.js file, create the analytics/analytics-google/ directories inside of _patterns/02-molecules/. Then, create a analytics-google.js file inside and write your own analytics code (or leave it blank).
Updating NDS
As the NIAID Design System evolves and improves, you may want to update your project to the latest NDS version. NDS has provided Gulp methods to update NDS automatically in some places, but there may be areas of your project where manual intervention is needed. Be sure to consult the Release Notes on Github or on the Support page for any potentially breaking changes.
The Gulp commands that update your project will pull the latest from a NDS submodule and transfer files into your project. Examples of folders and files that get replaced by this command are the 00-nds/ directory in _patterns, the global/ and libraries/ directories in css/, and the global/, utilities/, and libraries/ directories in js/.
If you have never updated your project using Gulp, you will need to initialize the NDS submodule: gulp init. Please note that this command will only work if your project is also tracked in a Git repository.
If you are sure you would like to update and the NDS submodule is installed, run the following command:
gulp updateDeveloping with the NIAID Design System
Get more information on how NDS is structured.
Develop with NDSThemes
NDS comes preconfigured with a set of theming options including heading and body font family, color palettes, and corner radius. For the complete set of options, visit the Theme Builder. NDS applies these styles through the use of classes applied to the <body> HTML tag. If using the Static Site Builder, add or remove the appropriate classes using the bodyClass parameter in the src/_data/data.json file.
Developing with Typography
NDS users can select font families for the headings and body of a page. For the headings, there are four available fonts to choose from: Public Sans, Roboto, Martel, and Merriweather. To apply one of these fonts to your headings, add the appropriate body class:
- Public Sans:
style--headings--public-sans - Roboto:
style--headings--roboto - Martel:
style--headings--martel - Merriweather:
style--headings--merriweather
For body font, NDS provides two options: Public Sans and Roboto. To apply one of these fonts to your body add the appropriate body class:
- Public Sans:
style--body--public-sans - Roboto:
style--body--roboto
You may download any of these font families below:
Developing with Colors
Currently, NDS users have three color palette options to choose from. More may be available in the future. Add the corresponding body class for your desired palette:
Theme 1 (Default):
style--colors--theme-1
#157B8D
Primary
#497951
Secondary
#262626
Tertiary
#75C3AC
Accent
Theme 2:
style--colors--theme-2
#586FAB
Primary
#247BA0
Secondary
#244D56
Tertiary
#FAB952
Accent
Theme 3:
style--colors--theme-3
#14675A
Primary
#423E63
Secondary
#123B56
Tertiary
#79A9D1
Accent
Developing with Shadows
NDS supports both flat and shadowed visual style. By default, NDS is configured with shadowing. If flat design is desired, remove the following class from the body:
style--shadows
Developing with Corners
There are three corner styles available with NDS: Sharp, Semi-Rounded, Fully-Rounded. To apply one of these corner styles to your site, add the appropriate body class:
- Sharp:
style--corners--straight - Semi-Rounded:
style--corners--semirounded - Fully-Rounded:
style--corners--rounded
Creating Pages
The 05-pages/ directory houses all of your website's pages. The index.twig file that comes with the Static Site Builder download is your home page, which you may edit to your liking. To create new pages, simply create a new folder in 05-pages/ and add a .twig file with the same name as the folder. The Static Site Builder uses the name of the page directory/.twig file for the production path. For instance, if you created clinical-trials/clinical-trials.twig folder and file, the production path to this page would be /clinical-trials. Some information for your page, such as a meta title and description, is configured in a .json file of the same name. View the index.json file for reference.
Building NDS for Production
When you are satisfied with your site pages, the Static Site Builder allows you to build a distribution folder (dist/) with all the necessary, web-ready assets. To do so, simply run:
gulp build --productionAfter running the "build" command, a dist/ directory will be created with production-ready assets. Upload the contents of this directory to your hosting platform.
Additional Resources
CSS & JS
Fonts
Design Files

Ask Questions, Report Issues, Stay Informed
For questions about the NIAID Design System or to report issues, please visit the Issues tab of the NDS repository on GitHub. To get updates on NDS features and changes, please add yourself as a "Watcher" on the NDS GitHub repository.
NDS on GitHub